Publishing My First Ansible Role on Ansible Galaxy Using Github Action
Ansible role is logical grouping of Ansible tasks.
Ansible task itself is the smallest unit of work in Ansible parlance.
Role is a unit that means to be shared among Ansible playbook.
It's also useful to break down complexity of Ansible playbook.
Ansible roles are equivalent to modules in Terraform, Cookbooks in Chef, and modules in Puppet.
Relation among Ansible task, role, and playbook can be depicted below. 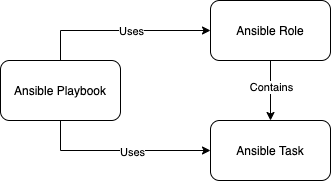
An Ansible role has the following structure:
README.md- This file offers detailed explanation about this role. It should also contain explanation of all input parameters and example usage.tasks- This directory contains list of task that will be executed by this role. Themain.ymlfile under this directory is the entrypoint.handlers- This directory contains a special task that will be executed typically at the end of role execution. Themain.ymlfile is the entrypoint.defaults- This directory contains default variables used in this role.vars- This directory consists of other variables that have higher priority than the defaults.files- This directory hosts file that may be copied into a target host.templates- This directory comprises of Jinja 2 template file that will be rendered in a target host.meta- This directory holds metadata information about the role such as role dependencies and information related to Ansible Galaxy.molecule- This directory contains files and directory required by molecule. Molecule itself is a framework to aid development and testing of Ansible Role.
In the next section, I share the journey of creating an Ansible role to set up Atlantis server on a Linux VM.
The VM must has a public IP address so it can receive webhook from Github.
The role also installs and configures Caddy 2 as a reverse proxy with automatic HTTPS certificate from Letsencrypt.
Atlantis doesn't have authentication so this role set up Oauth2 Proxy with Github as Identity Provider.
The role is named atlantis and published on Ansible Galaxy using Github Actions.
Preparing local machine
I am writing this Ansible role on MacOS Catalina. Here is packages that I need to install.
- Docker Desktop for Mac
- Python 3 using brew,
brew install python3. I need to do this since python 3 from Catalina has problem related to TLS certificate when downloading role from Ansible Galaxy. - Ansible, Molecule, and Molecule dependencies using pip3,
pip3 install ansible molecule docker yamllint ansible-lint
I encountered issue where molecule is failed to spawn target container.
To solve this problem, I uninstall above python packages using pip3 uninstall ansible molecule docker yamllint ansible-lint and reinstall them.
Preparing Ansible role structure
First of all, we need to create a directory structure for this role.
Let's use the molecule init command to do this.
molecule init role ansible-role-atlantis -d docker
rm -fr ansible-role-atlantis/{tests,.travis.yml}
We remove .travis.yml since we are using Github Actions to build and publish the role.
Here is the resulting directory structure.
ansible-role-atlantis
├── README.md
├── defaults
│   └── main.yml
├── files
├── handlers
│   └── main.yml
├── meta
│   └── main.yml
├── molecule
│   └── default
│       ├── INSTALL.rst
│       ├── converge.yml
│       ├── molecule.yml
│       └── verify.yml
├── tasks
│   └── main.yml
├── templates
└── vars
    └── main.yml
After the directory structure of the role is ready, let's put them in a git repository.
cd ansible-role-atlantis
git init
# Add gitignore rules
curl https://gitignore.io/api/macos,ansible > .gitignore
git add .
git commit -m 'Initial commit'
Configuring Molecule
Molecule configuration is located under the molecule directory.
The molecule init command creates a single scenario called default.
Let's configure default scenario to use a certain ubuntu 18.04 docker image.
# molecule/default/molecule.yml

---
dependency:
  name: galaxy
driver:
  name: docker
lint: |
  set -e
  yamllint .
  ansible-lint
platforms:
  - name: instance
    image: "geerlingguy/docker-${MOLECULE_DISTRO:-ubuntu1804}-ansible:latest"
    command: ${MOLECULE_DOCKER_COMMAND:-""}
    volumes:
      - /sys/fs/cgroup:/sys/fs/cgroup:ro
    privileged: true
    pre_build_image: true
provisioner:
  name: ansible
  playbooks:
    converge: ${MOLECULE_PLAYBOOK:-converge.yml}
With this configuration in place, let's spawn container using molecule create.
This command will launch a container and keep it running.
Let's test our role by running molecule converge.
This command should return error because the playbook is empty.
Let's configure playbook that will be run when molecule converge command issued.
Put the following playbook configuration on molecule/default/converge.yml
---
- name: Converge
  hosts: all
  become: true

  pre_tasks:
    - name: Update apt cache.
      apt:
        update_cache: true
        cache_valid_time: 600
      when: ansible_os_family == 'Debian'

  roles:
    - role: ansible-role-atlantis
With this molecule configuration in place, we are ready to start writing role logic. The Converge playbook is molecule way to call the role. So make sure to configure role name and its required variables in the playbook.
Molecule provides mechanism to run acceptance test via the molecule verify command.
The acceptance test is just another playbook that's typically named verify.yml.
For this role, the acceptance is Caddy, Oauth2 Proxy, and Atlantis services are enabled and running.
Let's create molecule/default/verify.yml file with the following content.
# molecule/default/verify.yml
---
- name: Verify
  hosts: all
  tasks:
    - name: Populate services facts
      service_facts:

    - name: Verify that Caddy, Oauth2 Proxy, and Atlantis are running
      assert:
        that:
          - ansible_facts.services["caddy.service"].state == 'running'
          - ansible_facts.services["caddy.service"].status == 'enabled'
          - ansible_facts.services["atlantis.service"].state == 'running'
          - ansible_facts.services["atlantis.service"].status == 'enabled'
          - ansible_facts.services["oauth2-proxy.service"].state == 'running'
          - ansible_facts.services["oauth2-proxy.service"].status == 'enabled'
Role development using molecule workflow looks like the following.
- Prepare testing target host using
molecule create. - Visualize role logic in mind.
- Write logic into Ansible task.
- Run
molecule convergeto see how tasks are applied in the target host. - Check syntax and code style using
molecule lint. - Run acceptance test using
molecule verify. - Repeat from step 2 until satisfied.
Publishing role to Ansible Galaxy
Before publishing role to Ansible Galaxy, we need to enrich the role with additional information. The first one is role should have a README.md. This file contains description, variables explanation, and usage example of the role. Another information that is typically written in the file is author, license, role dependencies, and requirement.
The second file that important is meta/main.yml.
In this file, we declare dependencies of the role.
It contains several bits of information that necessary for Ansible Galaxy.
Those information are author, role name, description, license, requirement, and platforms that this role support.
Chief of the platform is operating system and version where this role is tested such as Ubuntu 18.04.
Ansible Galaxy supports importing role from a Github repository. So let's put this role on a Github repository.
- Create a new public repository on Github. I use repo named
ansible-role-atlantisin this case. - Register the newly created Github repository as remote origin,
git remote add origin git@github.com:ringanta/ansible-role-atlantis. - Push local repository to Github,
git push -u origin master.
We can use the ansible-galaxy command to import role from Github to Ansible Galaxy.
- Generate a Github personal access token on https://github.com/settings/tokens/new. We can use token without any scope here.
- Login to Ansible Galaxy using
ansible-galaxy role login --github-token=<github personal access token> - Import role to Ansible Galaxy,
ansible-galaxy role import ringanta ansible-role-atlantis.
Publishing role using local machine requires us to run ansible-galaxy role import after pushing changes to Github repository.
To reduce this load, lets configure Github Action that will publish role to Ansible Galaxy everytime we push change.
Let's use Galaxy action from Github Action marketplace.
Create a new secrets on Github repository of the role. The secret must be named
galaxy_api_keywith value comes from Galaxy API token. This token can be obtained usingcat ~/.ansible/galaxy_token | cut -d ':' -f2 | tr -d ' 'Create Github Actions directory,
mkdir .github/workflowsCreate workflow file such as
publish-role-galaxy.ymlfile under.github/workflowswith the following content--- name: Publish role to Ansible Galaxy on: - push jobs: build: runs-on: ubuntu-latest steps: - name: checkout uses: actions/checkout@v2 - name: galaxy uses: robertdebock/galaxy-action@1.0.3 with: galaxy_api_key: ${{ secrets.galaxy_api_key }}Commit changes and push to Github. Action will be triggered and the role published to Ansible Galaxy. Example of successful Action that publish role is depicted below

Conclusion
This post is my journey publishing an Ansible Role named atlantis to setup Atlantis, Caddy, and Oauth2 Proxy to the Ansible Galaxy.
The role achieves 5/5 quality score.
Source code of the role is available on https://github.com/ringanta/ansible-role-atlantis.
The role is published using Github Action and available on https://galaxy.ansible.com/ringanta/atlantis.